這篇文章將介紹如何在 Rails 中使用 Stripe 來處理信用卡交易; Stripe 相較於 Paypal 的優點除了設定簡單、安全性高、費用較低,同時還為您處理了繁雜的 merchant account 交易問題。 基於上述理由,Stripe 在國外已經成為相當受到矚目的金流明星, 並且支援大陸的支付寶, 然而在台灣尚未開放使用,希望這家公司能早日進軍台灣的市場。
安裝套件
在 Gemfile 中加入
gem 'stripe', :git => 'https://github.com/stripe/stripe-ruby'
gem 'figaro'
然後執行 bundle install 進行安裝。
註冊帳號
先到 Stripe 進行註冊, 註冊後,請在您帳號下取得 API Keys。
設定 API Keys
這裡我們使用 figaro 來儲存不同環境(開發、測試或上線)下的 API keys。
請在專案目錄下,執行 figaro install,這命令將
- 自動產生
config/application.yml - 將此檔案加到
.gitignore裡面
然後在 application.yml 裡面加入 keys
config/application.yml:
development:
  STRIPE_PUBLISHABLE_KEY: 您的 test publishable key
  STRIPE_SECRET_KEY: 您的 test secret key

test:
  STRIPE_PUBLISHABLE_KEY: 您的 test publishable key
  STRIPE_SECRET_KEY: 您的 test secret key

production:
  STRIPE_PUBLISHABLE_KEY: 您的 live publishable key
  STRIPE_SECRET_KEY: 您的 live secret key
處理交易
倘若我們想設計一個網站, 讓使用者可以刷卡來支付網站的註冊費用。 參考 Stripe 的說明, 然後在處理註冊行為的 controller 中, 加入對應的程式碼
users_controller.rb:
class UsersController < ApplicationController

  ... 省略程式碼 ...

  def create
    @user = User.new(user_params)

    if @user.save
      session[:user_id] = @user.id
      handle_invitation
      AppMailer.delay.send_welcome_email(@user)
      flash[:success] = "Your are registered."

      # 使用 Stripe 服務
      Stripe.api_key = ENV['STRIPE_SECRET_KEY']
      token = params[:stripeToken]
      begin
        Stripe::Charge.create(
          :amount => 999, # in cents
          :currency => "usd",
          :card => token,
          :description => "Sign up for #{@user.email}"
        )
      rescue Stripe::CardError => e
        flash[:danger] = e.message
      end

      redirect_to home_path
    else
      flash[:danger] = "There's something wrong during registration."
      render :new
    end
  end

  ... 省略程式碼 ...

end
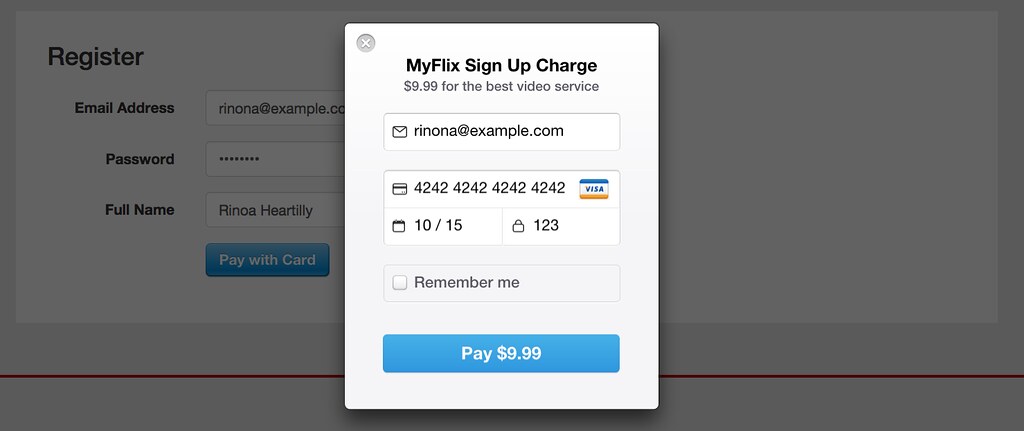
內嵌表格
使用 Stripe 所提供 Checkout, 可以簡單地地加入交易按鈕,如下所示
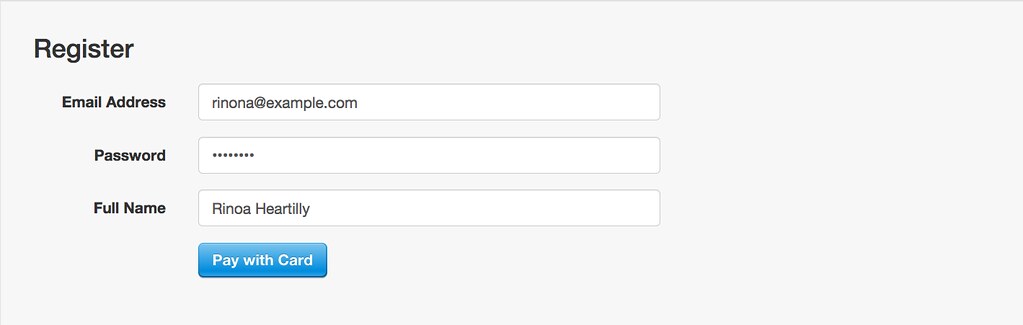
點選按鈕後,使用者可以在跳出的表格內輸入信用卡資訊,然後送出
對應的程式碼如下
app/views/users/new.html.haml
%section.register.container
  .row
    .col-sm-10.col-sm-offset-1
      = bootstrap_form_for @user, layout: :horizontal, lablel_col: "col-sm-2", control_col: "col-sm-6" do |f|
        %header
          %h1 Register
        %fieldset
          = f.email_field :email, label: "Email Address"
          = f.password_field :password
          = f.text_field :full_name, label: "Full Name"
          = hidden_field_tag :invitation_token, @invitation_token
        = f.form_group do
          -# Stripe 提供的 javascript
          <script src="https://checkout.stripe.com/checkout.js" class="stripe-button" data-key=#{ENV['STRIPE_PUBLISHABLE_KEY']} data-amount="999" data-name="MyFlix Sign Up Charge" data-description="$9.99 for the best video service"> </script>
自定表格
假設我們希望自定信用卡的交易表格, 那可以參考 Stripe Custom Forms 的流程, 直接在 view 中使用 Stripe.js, 如以下範例
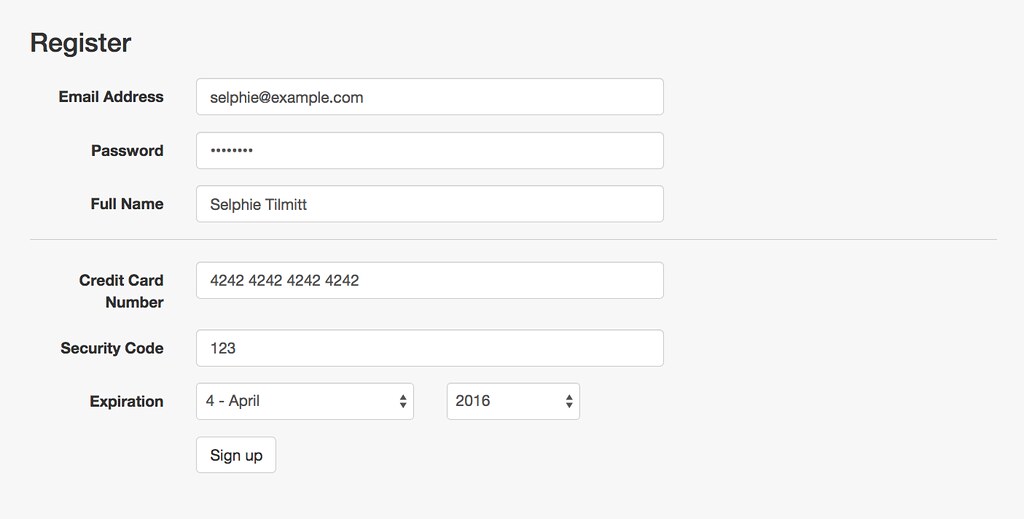
app/views/users/new.html.haml:
<script type="text/javascript" src="https://js.stripe.com/v2/"></script>
<script type="text/javascript">
Stripe.setPublishableKey("#{ENV['STRIPE_PUBLISHABLE_KEY']}");
</script>

= javascript_include_tag 'payment'

%section.register.container
  .row
    .col-sm-10.col-sm-offset-1
      = bootstrap_form_for @user,
        layout: :horizontal, lablel_col: "col-sm-2", control_col: "col-sm-6",
        html: { id: "payment-form" } do |f|
        %header
          %h1 Register
        %fieldset
          = f.email_field :email, label: "Email Address"
          = f.password_field :password
          = f.text_field :full_name, label: "Full Name"
          = hidden_field_tag :invitation_token, @invitation_token
        %fieldset.credit_card
          %span.payment-errors
          .form-group
            %label.control-label.col-sm-2 Credit Card Number
            .col-sm-6
              %input.form-control(type="text" data-stripe="number")
          .form-group
            %label.control-label.col-sm-2 Security Code
            .col-sm-6
              %input.form-control(type="text" data-stripe="cvc")
          .form-group
            %label.control-label.col-sm-2 Expiration
            .col-sm-3
              = select_month(Date.today, {add_month_numbers: true},  class: 'form-control', data: {stripe: "exp-month"})
            .col-sm-2
              = select_year(Date.today.year, {start_year: Date.today.year, end_year: Date.today.year + 4}, class: 'form-control', data: {stripe: "exp-year"})
        = f.form_group do
          = f.submit "Sign up"
{% endcodeblock %}
上面程式碼所用到的 payment.js 內容如下
app/assets/javascripts/payment.js:
jQuery(function($) {
  $('#payment-form').submit(function(event) {
    var $form = $(this);

    // Disable the submit button to prevent repeated clicks
    $form.find('button').prop('disabled', true);

    Stripe.card.createToken($form, stripeResponseHandler);

    // Prevent the form from submitting with the default action
    return false;
  });

  function stripeResponseHandler(status, response) {
    var $form = $('#payment-form');

    if (response.error) {
      // Show the errors on the form
      $form.find('.payment-errors').text(response.error.message);
      $form.find('button').prop('disabled', false);
    } else {
      // response contains id and card, which contains additional card details
      var token = response.id;
      // Insert the token into the form so it gets submitted to the server
      $form.append($('<input type="hidden" name="stripeToken" />').val(token));
      // and submit
      $form.get(0).submit();
    }
  };

});